- Importance of following step by step instructions in woodworking projects.
- Tips for learning basic woodworking skills before attempting more complex projects
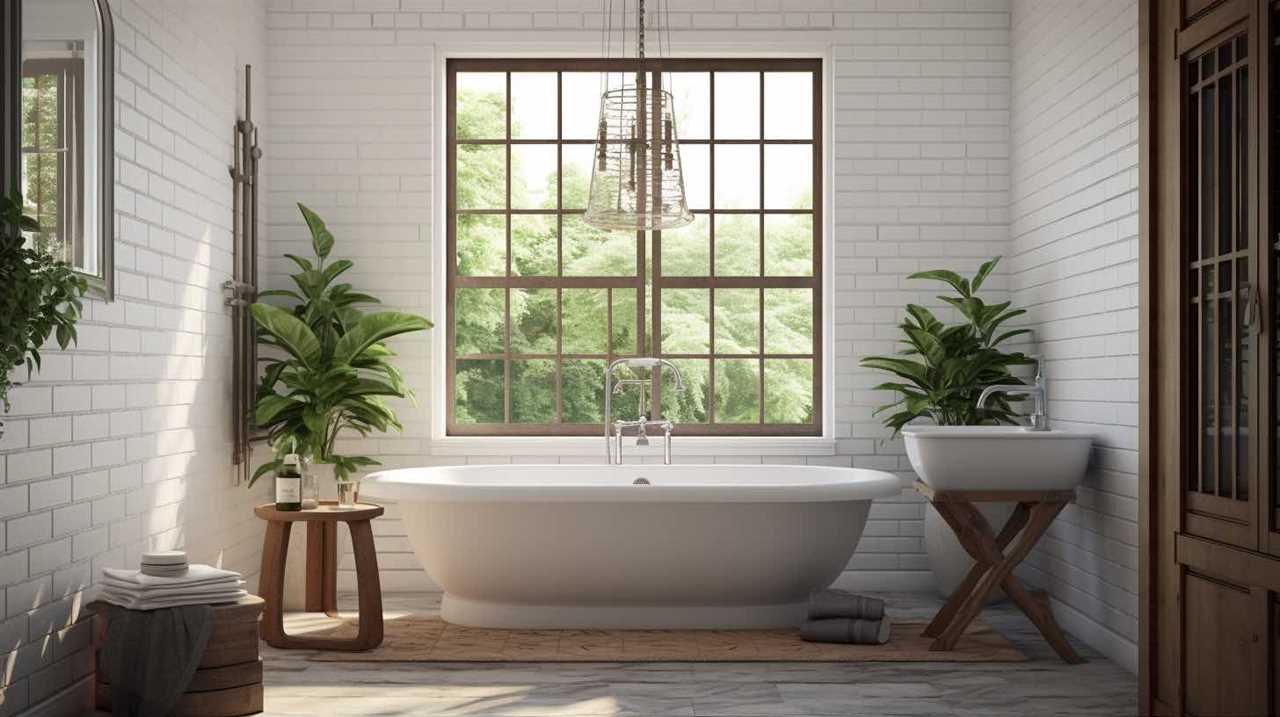
Heads up, everyone! We’ve got an exciting project on the agenda today: building a farmhouse-style bathroom vanity that features a handy shelf.
Get ready to roll up your sleeves and dive into some DIY goodness.
In this article, we’ll walk you through the step-by-step process of choosing the right materials, measuring and cutting the wood, assembling the vanity frame, adding the shelf and storage, and finishing it off with a fresh coat of paint and snazzy hardware.
Let’s get started!
Key Takeaways
- Choose high-quality, moisture-resistant materials for durability in the bathroom
- Utilize pocket hole joinery for a strong and secure vanity frame
- Attach the shelf securely using screws and wood glue to prevent instability
- Apply multiple coats of paint for a beautiful finish and consider using a primer for better adhesion
GUTINNEEN Large Chicken Coop with All Around Metal Frame Mobile Hen House with Wheels Weatherproof Duck House with Nesting Box, Outdoor Run, Perch, Leakproof Tray for 6-8 Chickens 85" L
Spacious Coop for 6-8 Hens: Measuring 85.59"L x 48.2"W x 48.2"H, this large chicken coop provides plenty of...
As an affiliate, we earn on qualifying purchases.
Choosing the Right Materials
We’ll start by considering the durability of the materials for our farmhouse bathroom vanity with shelf.
When it comes to building a farmhouse-style vanity, choosing the right materials is crucial. For the base, we recommend using solid wood, such as oak or pine, as it not only provides strength but also adds to the rustic charm of the farmhouse style.

To ensure longevity, it’s essential to select a high-quality paint that’s specifically designed for bathroom use. Look for a paint that’s moisture-resistant and can withstand the humidity often present in bathrooms. Applying multiple coats of the best paint will help protect the wood and create a beautiful, long-lasting finish.
Now that we’ve discussed the importance of materials, let’s move on to measuring and cutting the wood.

PETS TUFF Chicken Chalet - Chicken Coop for Chickens, Ducks, Rabbits & More - Predator-Resistant, Strong Wire with Mesh Bottom - Wheels for Easy Moving - Wind & Snow Durable Chicken Pen - 124”x81”x79”
SECURE AND SAFE COOP: PetsTuff Chicken Run is designed to keep your animals secure and protected. The chicken...
As an affiliate, we earn on qualifying purchases.
Measuring and Cutting the Wood
To ensure accurate and precise cuts, we’ll carefully measure the dimensions of the wood using a tape measure and mark them with a pencil. Here’s how we’ll proceed:
-
Measure and mark the length and width of each piece of wood needed for the vanity and shelf.
-
Use a circular saw or miter saw to cut the wood according to the measurements and marks.
-
After cutting, sand the edges of the wood to smooth out any roughness or splinters.

-
If desired, you can also sand the surfaces of the wood to prepare them for staining or painting.
Once the wood is cut and sanded, you can proceed to attach the legs to the vanity. Make sure to align them properly and use screws or nails to secure them in place.
With the wood properly measured, cut, and prepared, you’re one step closer to completing your farmhouse bathroom vanity.

Suchtale Upgrade 40-Inch Tow Behind Spiker Seeder,Combination Tow Spike Aerator,Broadcast Spreader,Steel Hopper Lawn Drop Seed Fertilizer and Spreader,Lawn Soil Aerator Spikes Tractor
Spike Aerator and Spreader Combo: This broadcast spreader combines the functions of both spreading and aerating. It ensures...
As an affiliate, we earn on qualifying purchases.
Assembling the Vanity Frame
First, we’ll gather all the necessary pieces of wood and hardware for assembling the vanity frame.
When it comes to joinery techniques for a sturdy vanity frame, we recommend using pocket hole joinery. This method involves drilling pocket holes into one piece of wood and then screwing it to another piece at an angle. This creates a strong and secure connection.
Additionally, consider the design considerations for a farmhouse style bathroom vanity. For an authentic farmhouse look, use distressed or weathered wood. You can also incorporate decorative elements such as beadboard paneling or barn door style doors.

The vanity frame should be built to accommodate the dimensions of the chosen sink and countertop.

Agri-Fab 45-0463 130 lb. Tow-Behind Lawn & Garden Broadcast Spreader for Seed,Fertilizer,Salt,Ice Melt; Easy to use Flow Control from Seat of Riding Lawn Mower
MADE IN USA
As an affiliate, we earn on qualifying purchases.
Adding the Shelf and Storage
After securing the vanity frame to the wall, we can begin by attaching the shelf to the bottom of the frame using screws and wood glue. This will provide additional storage space for bathroom essentials while maintaining the rustic farmhouse aesthetic.
Here are four steps to help you successfully add the shelf and storage:
-
Measure and cut the shelf to fit the dimensions of the vanity frame. Ensure that it’s level and centered before proceeding.
-
Apply wood glue to the top surface of the vanity frame. This will help secure the shelf in place and prevent any wobbling or instability.
-
Place the shelf onto the glued surface of the frame, making sure it’s aligned properly. Secure it further by using screws to attach it from underneath the frame.

-
Allow the wood glue to dry completely before placing any items on the shelf. This will ensure maximum stability and durability.
Finishing Touches: Painting and Hardware Installation
With a fresh coat of paint and the installation of hardware, we can complete the farmhouse bathroom vanity and add the final touches to enhance its overall aesthetic.
First, choose a paint color that complements the style of your bathroom. Popular options for farmhouse vanities include neutral shades like white, gray, or beige. These colors create a clean and timeless look.
Before painting, make sure to sand the surface of the vanity to ensure a smooth finish. Apply a primer to help the paint adhere better. Once the primer is dry, paint the vanity using a brush or roller, applying thin, even coats. Allow each coat to dry before applying the next.
Frequently Asked Questions
How Long Does It Typically Take to Complete This Farmhouse Bathroom Vanity Project?
Typically, it takes us a few days to complete a farmhouse bathroom vanity project. However, troubleshooting common issues and choosing the right finish can affect the timeline.
What Should I Do if I Make a Mistake While Measuring and Cutting the Wood?
If a mistake occurs during wood measuring and cutting, we can employ alternative measurements and precise adjustments. By carefully assessing the error, we can rectify it by trimming or replacing the affected pieces.

Can I Customize the Size of the Vanity to Fit My Specific Bathroom Dimensions?
Yes, you can customize the size of the vanity to fit your specific bathroom dimensions. We offer a range of customization options, such as adjusting the width, height, and depth. Additionally, alternative materials can be used for a unique look.
Are There Any Specific Tools or Equipment Required for This Project That Are Not Mentioned in the Article?
There are a few specific tools and equipment that you may need for this project. We’ll provide step by step instructions, troubleshooting tips, and alternative design options. Let’s get started!
Is It Necessary to Have Previous Woodworking Experience in Order to Successfully Complete This Project?
It is not necessary to have previous woodworking experience to successfully complete this project. However, it is important to follow step by step instructions and consider learning basic woodworking skills before attempting more complex projects.
Conclusion
In conclusion, building a farmhouse bathroom vanity with a shelf can be a rewarding project that adds charm and functionality to your bathroom. By following the steps outlined in this article, you can create a beautiful vanity that perfectly fits your space and style.
Did you know that farmhouse-style bathrooms have gained popularity in recent years, with a 125% increase in searches for farmhouse bathroom vanities? So why not join the trend and create your own stunning farmhouse vanity today?