Get ready to unleash your inner do-it-yourself enthusiast! We’ve curated a selection of 10 easy, rural-style projects that will surely transform your outdoor space into a bastion of pastoral elegance.
From building fences that exude charm to designing cozy outdoor fire pits perfect for roasting marshmallows, we’ve got you covered. So grab your tools and let’s dive into these practical and detailed projects that will have your neighbors green with envy.
Let the creativity flow and let’s get started!
Key Takeaways
- Building a rustic fence
- Constructing a raised garden bed
- Designing a cozy outdoor fire pit
- Building a charming chicken coop
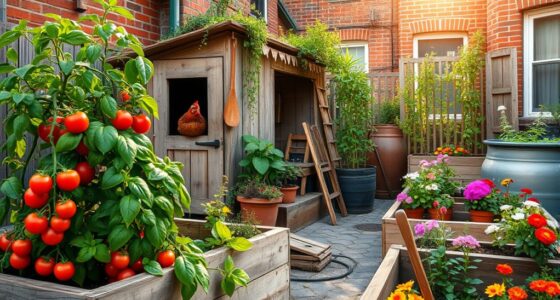
Building a Rustic Fence
We’re excited to start building our rustic fence using reclaimed wood from our property.
When it comes to maintaining a rustic fence, there are a few key factors to consider.
One important aspect is choosing the right fence stain. Look for a stain that’s specifically designed for outdoor use and offers protection against weathering and UV damage. It’s also important to choose a stain that complements the natural color and texture of the reclaimed wood.
Before applying the stain, make sure to clean the wood thoroughly and remove any dirt or debris. Apply the stain evenly using a brush or roller, and allow it to dry completely before adding a second coat if needed.
Regularly inspect your rustic fence for any signs of wear or damage, and touch up the stain as necessary to keep it looking its best.
Constructing a Raised Garden Bed
Let’s talk about constructing a raised garden bed.
To start, you’ll need materials such as wood planks, screws, and a level.
Raised beds offer many benefits, such as improved drainage and easier access for gardening.
Now, let’s dive into the step-by-step process of building one.
Materials Needed
We have all the materials needed to construct a raised garden bed.
Building a raised garden bed is a cost-effective alternative to traditional gardening. It allows us to create a controlled environment for our plants while also minimizing the use of space.
To begin, we’ll need four pieces of lumber, each measuring 2×6 inches and cut to the desired length. Additionally, we’ll need galvanized screws, a drill, a level, and a shovel.
For the bottom of the bed, we can use weed fabric to prevent weed growth and maintain proper drainage.
Lastly, we can add organic soil and compost to provide the necessary nutrients for our plants.
With these materials, constructing a raised garden bed becomes a simple DIY project that anyone can tackle.
Benefits of Raised Beds
After constructing a raised garden bed, we can immediately enjoy the benefits of increased drainage and improved soil quality. Raised beds provide several advantages for gardeners, making them a popular choice for both beginners and experienced gardeners alike.
One of the key benefits of raised beds is the improved drainage they offer. The elevated structure allows excess water to drain more efficiently, preventing waterlogged roots and reducing the risk of root rot. This is especially beneficial for plants that are sensitive to overwatering.
Another advantage of raised beds is the ability to customize the soil quality. By filling the bed with a mix of compost, topsoil, and other organic matter, we can create an ideal growing environment for our plants. This ensures that they receive the necessary nutrients and have optimal root development.
Additionally, raised beds make gardening more accessible and manageable. The elevated height reduces the strain on our backs and knees, making it easier to tend to our plants. The confined space also helps to prevent weed growth and allows for better plant organization.
In summary, the benefits of raised beds are clear. They provide improved drainage, enhanced soil quality, and make gardening more enjoyable and accessible. So, if you’re looking to elevate your gardening experience, consider constructing a raised bed for your next project.
| Benefits | Advantages | Elevated Gardening |
|---|---|---|
| Increased drainage | Customizable soil | Better accessibility |
| Improved soil quality | Reduced weed growth | Enhanced plant organization |
| Easier maintenance | Optimal root development | Enjoyable gardening experience |
Step-By-Step Construction Process
During the step-by-step construction process of a raised garden bed, we carefully follow the instructions to ensure a sturdy and functional structure. Here is our step-by-step guide, along with some tips and tricks, to help you build your own raised garden bed:
-
Choose the location: Find a spot that receives ample sunlight and is easily accessible for watering and maintenance.
-
Gather materials: Gather the necessary materials like wood, screws, and a level to ensure a straight and level bed.
-
Measure and mark: Measure and mark the dimensions of your bed, ensuring it’s the desired height and width.
-
Assemble the bed: Start by attaching the corner posts, then attach the side panels, and finally secure the bed together.
With these step-by-step instructions and helpful tips, you can create a raised garden bed that will provide a great environment for your plants to thrive.
Now, let’s move on to designing a cozy outdoor fire pit for your backyard.
Designing a Cozy Outdoor Fire Pit
Let’s gather around the crackling fire pit and enjoy the cozy ambiance it creates.
When it comes to outdoor fire pit safety, choosing the right materials is crucial. The first thing to consider is the location of your fire pit. It should be placed on a non-combustible surface, away from any structures or trees, and at least 10 feet away from anything flammable.
As for the materials, there are various options available. Fire pits can be made from metal, such as stainless steel or cast iron, which are durable and resistant to heat. Another popular choice is stone or brick, which adds a rustic and natural look to your outdoor space.
Whichever material you choose, make sure it’s designed to withstand high temperatures and has proper ventilation to prevent smoke buildup.
Building a Charming Chicken Coop
When it comes to building a charming chicken coop, there are a few essential design elements to consider.
First, you want to ensure that the coop provides enough space for your chickens to move around comfortably and lay their eggs.
Next, using cost-effective building materials, such as reclaimed wood or repurposed materials, can help keep your expenses low.
Coop Design Essentials
Building a charming chicken coop is essential for creating a comfortable and safe environment for our flock. It’s important to consider coop design essentials to ensure our chickens thrive.
Here are four key factors to keep in mind:
-
Coop Size: Providing adequate space is crucial for our chickens’ well-being. Aim for at least 4 square feet per bird to prevent overcrowding and allow for easy movement.
-
Proper Ventilation: Good airflow is essential to prevent the buildup of harmful ammonia gases and moisture. Install vents or windows to allow fresh air to circulate while keeping predators out.
-
Secure Flooring: Choose flooring materials that are easy to clean and resistant to moisture and pests. Options like concrete, linoleum, or vinyl are ideal for maintaining a clean and hygienic coop.
-
Regular Maintenance: To keep our coop in top shape, regular maintenance is key. This includes cleaning droppings, checking for any damage or wear, and ensuring proper insulation and weatherproofing.
Cost-Effective Building Materials
We can easily create a charming chicken coop by using cost-effective building materials, such as reclaimed wood or recycled metal, and it will be both budget-friendly and environmentally friendly.
When it comes to flooring options, there are several cost-effective choices that are also sustainable. One option is using recycled rubber flooring. It’s durable, easy to clean, and provides good insulation for the chickens. Another option is using straw or hay as a natural and inexpensive flooring material. It provides a comfortable and soft surface for the chickens to walk on.
Additionally, using salvaged materials for the coop’s structure, like reclaimed wood or recycled metal, not only saves money but also reduces waste and promotes sustainability.
Maximizing Space Efficiency
As we explore ways to maximize space efficiency in our charming chicken coop, it’s important to consider utilizing vertical shelving and nesting boxes. By incorporating these space-saving techniques, we can create a more organized and functional environment for our feathered friends.
Here are four practical ways to make the most of our vertical space:
-
Install wall-mounted shelving: By using the walls of the coop, we can free up valuable floor space. These shelves can be used to store supplies, feed, and equipment, keeping them easily accessible and out of the way.
-
Utilize hanging nesting boxes: Instead of traditional nesting boxes taking up floor space, we can hang them from the walls. This not only saves space but also provides a cozy and private area for our hens to lay their eggs.
-
Use vertical roosting bars: Rather than having bulky horizontal roosting bars, we can install narrow vertical bars. This allows more chickens to roost comfortably while maximizing the use of vertical space.
-
Hang feeders and waterers: By suspending these essential items from the ceiling or walls, we can save precious floor space and prevent spills and mess.
Creating a DIY Compost Bin
Our family loves using a DIY compost bin to reduce waste and create nutrient-rich soil for our garden.
Composting is a simple and effective way to recycle organic materials and transform them into a valuable resource.
There are various DIY composting methods that can be easily implemented at home.
One popular method is the ‘pile’ system, where organic waste such as fruit and vegetable scraps, coffee grounds, and yard trimmings are piled together and allowed to decompose naturally.
Another method is the ‘bin’ system, where a container or bin is used to hold the compost materials and accelerate the decomposition process.
The benefits of composting are numerous. It reduces landfill waste, improves soil structure, retains moisture, and provides essential nutrients for plants.
Crafting a Custom Outdoor Bench
How can we use our DIY skills to create a custom outdoor bench for our backyard? With a little creativity and some basic tools, we can transform our outdoor space into a cozy and personalized oasis. Here’s how:
-
Find the perfect base: Look for an old picnic table or sturdy wooden bench that can be repurposed for the project. This will save us money and give the bench a unique touch.
-
Customize the design: Decide on the style and dimensions of the bench. We can add armrests, a backrest, or even storage compartments to make it more functional.
-
Sand and finish: Start by sanding the surface to remove any rough edges or splinters. Then, apply a weather-resistant finish or paint to protect the wood from the elements.
-
Add personal touches: Finally, let our creativity shine by adding cushions, pillows, or even a pop of color with outdoor fabric. This won’t only make our bench comfortable but also reflect our personal style.
Installing a Decorative Pergola
Let’s start by measuring the space where we want to install the decorative pergola, and then we can carefully plan out the design and gather all the necessary materials for the project.
When it comes to designing a pergola, there are countless ideas to choose from. You can opt for a classic design with wooden beams and lattice panels for a timeless look, or go for a more modern and minimalist style using sleek metal frames and clean lines.
Once you have decided on the design, it’s important to consider pergola maintenance tips to ensure its longevity. Regular cleaning and inspection of the structure, as well as treating any wood with a protective sealant, can help prevent rot and damage from the elements.
With a well-designed and well-maintained pergola, you can create a beautiful and functional outdoor space to enjoy for years to come.
Building a Simple Wood Shed
We can construct a basic wood shed using affordable materials and simple tools. Here are some tips to help you with your wood shed project:
-
Choose the right design: Consider the size and layout of your backyard, as well as your storage needs. Look for wood shed designs that fit your space and provide enough room for your tools and equipment.
-
Gather your materials: Purchase the necessary lumber, screws, nails, and roofing materials. Make sure to choose materials that are durable and weather-resistant.
-
Prepare the site: Clear the area where you plan to build the wood shed. Level the ground and lay a foundation using concrete blocks or treated lumber.
-
Organize your shed: Once your wood shed is built, it’s important to keep it organized. Install shelves, hooks, and storage bins to maximize space and keep your tools easily accessible.
Building a wood shed can provide you with valuable storage space and help keep your backyard organized. With a little planning and effort, you can create a functional and attractive wood shed that meets your needs.
Designing a Rustic Outdoor Kitchen
When designing a rustic outdoor kitchen, there are three key points to consider: essential cooking equipment, rustic design elements, and the outdoor kitchen layout.
First, it’s important to choose the right cooking equipment, such as a grill, smoker, or pizza oven, depending on your preferences.
Second, incorporating rustic design elements like reclaimed wood, stone accents, and vintage lighting can add a charming and timeless feel to your outdoor kitchen.
Lastly, carefully planning the layout of your outdoor kitchen, considering factors like the flow of traffic, workspace, and seating areas, will ensure a functional and enjoyable cooking space.
Essential Cooking Equipment
The essential cooking equipment for our rustic outdoor kitchen includes a cast iron skillet and a propane grill. These two items are crucial for any outdoor cooking enthusiast.
Here are four other must-have kitchen gadgets that will take your outdoor cooking to the next level:
-
Grill Thermometer: This handy device ensures that your meat is cooked to perfection by accurately measuring the internal temperature. No more guessing or cutting into the meat to check doneness!
-
BBQ Tongs: Long, sturdy tongs are essential for flipping steaks, burgers, and veggies on the grill. Look for tongs with a non-slip grip to prevent accidents.
-
Grill Brush: Keep your grill clean and ready for cooking by regularly brushing off any residue. A good grill brush will have sturdy bristles and a scraper for stubborn grime.
-
Meat Injector: Add flavor and moisture to your meats by using a meat injector. Fill it with your favorite marinade or seasoning and inject it directly into the meat for a delicious result.
Rustic Design Elements
Using reclaimed wood for countertops and shelves adds a charming touch to our rustic outdoor kitchen. Not only does it create a unique and rustic look, but it also promotes sustainability by repurposing materials. Reclaimed wood can be sourced from old barns, fences, or even pallets, making it a cost-effective and eco-friendly option for DIY rustic furniture.
To give you an idea of the possibilities, here is a table showcasing different reclaimed wood projects for rustic home decor:
| Project | Materials Needed |
|---|---|
| Farmhouse Dining Table | Reclaimed barn wood, screws, sandpaper |
| Floating Shelves | Reclaimed pallet wood, brackets, screws |
| Kitchen Island | Reclaimed fence panels, hinges, paint |
Outdoor Kitchen Layout
Let’s start by discussing three key considerations when designing our rustic outdoor kitchen layout.
-
Functionality: When planning the layout of our outdoor kitchen, it’s important to consider the placement of our outdoor kitchen appliances. We should ensure that they’re conveniently located for easy access and efficient cooking. This includes considering the placement of our grill, refrigerator, and sink.
-
Bar Area Design: Creating a designated bar area in our outdoor kitchen can enhance the overall functionality and entertainment value of the space. We can incorporate features like a built-in bar counter, bar stools, and a small refrigerator for storing beverages. This will provide a perfect spot for socializing and enjoying drinks while cooking.
-
Aesthetic Appeal: Designing a rustic outdoor kitchen layout also involves considering the overall aesthetic appeal. We can achieve this by using natural materials, such as stone or wood, for countertops and backsplashes. Additionally, incorporating elements like hanging plants, string lights, and decorative outdoor furniture can create a cozy and inviting atmosphere.
By carefully considering these three key aspects, we can create a functional and visually appealing rustic outdoor kitchen layout that suits our needs and enhances our outdoor living experience.
Now, let’s move on to discussing the next topic of constructing a functional tool shed.
Constructing a Functional Tool Shed
We’re excited to start constructing our functional tool shed to store all of our equipment and tools.
One important aspect of designing a functional tool shed is creating a workbench that suits our needs. We plan to build a sturdy workbench that provides ample workspace and includes storage options such as shelves or drawers.
It’s crucial to choose the right storage solutions to keep our tools organized and easily accessible. We’ll consider using pegboards or wall-mounted tool racks to maximize space and make it easy to find the tools we need.
Additionally, we’ll incorporate shelving units or cabinets to store larger items and keep them protected from dust and moisture.
Frequently Asked Questions
How Much Does It Cost to Build a Rustic Fence?
Building a rustic fence can be cost effective by using alternative materials like reclaimed wood or metal. Factors like fence height, length, and style impact the overall cost. DIY projects can save money.
What Materials Should I Use to Construct a Raised Garden Bed?
For a raised garden bed, we recommend using rot-resistant wood like cedar or redwood. Make sure to choose a location with plenty of sunlight and good drainage. Plant a variety of vegetables and flowers and regularly water and weed to maintain a healthy bed.
How Can I Ensure Safety When Building a Cozy Outdoor Fire Pit?
When building an outdoor fire pit, it’s crucial to prioritize safety. We’ll guide you through essential tips for designing a cozy fire pit that ensures a safe and enjoyable experience for everyone.
Are There Any Specific Regulations or Guidelines for Building a Chicken Coop?
There are specific regulations and guidelines for building a chicken coop. Here are some tips for chicken coop construction: ensure adequate space, proper ventilation, secure fencing, and easy access for cleaning and feeding.
What Steps Should I Follow to Create a Successful DIY Compost Bin?
To create a successful DIY compost bin, we need to follow a few essential steps. First, choose the right composting method based on space and needs. Then, gather organic materials, maintain proper moisture and aeration, and turn the pile regularly for optimal results.
Conclusion
So there you have it, folks. These rural DIY projects are as easy as pie. Who knew that building fences, raising garden beds, and constructing chicken coops could be so simple?
With just a little bit of time and effort, you can transform your rural space into a functional and charming oasis.
So roll up your sleeves, grab your tools, and get ready to impress your neighbors with your newfound DIY skills.
Happy building!

Virginia’s deep-rooted love for farmhouse aesthetics is reflected in her articles. As an author, she dives deep into the history and trends of farmhouse designs, creating pieces that resonate with both novices and aficionados.